

What could a manual review miss across endpoints, mailboxes and shared files? Sensitive data can sit in places that are difficult to check one by one. The data discovery essentials start with knowing which sources are in scope and what evidence a scan should return.
For compliance teams, data discovery means locating and mapping sensitive information so they can see where it is held and review potential exposure. It’s a practical concern for organisations working with GDPR or PCI requirements, but discovery alone doesn’t establish compliance or replace legal advice.
This article explains what data discovery covers, what to confirm before scanning and how to make findings useful without exposing file contents unnecessarily. You’ll consider scan boundaries, source coverage and evidence such as masked previews, fingerprints and audit logs. You’ll also see how local processing works and how mailbox, external hard drive and OCR scanning options can affect coverage. The aim is to help you choose a clear next step based on your team’s needs and scope.
Key Takeaways
- The data discovery essentials begin with a clear purpose and defined scan boundaries, so teams know exactly what the review covers.
- Build a source inventory of approved endpoints and relevant files, mailboxes, external hard drives or scanned documents.
- Before scanning, check where processing happens and whether file contents leave the endpoint.
- Choose evidence that supports review while limiting exposure, such as masked previews and salted fingerprints.
- Use a simple sequence to set scope, scan, assess findings, record decisions and revisit the plan when sources change.
What data discovery essentials mean for sensitive data
Sensitive data discovery means finding and mapping sensitive information across sources selected for scanning. The aim is to identify what type of information appears and where it is stored, such as personal details in a document or payment card data in a file. For compliance and security teams, this gives a clearer view of the data they may need to review or protect.
In this guide, discovery means locating sensitive information for compliance and security work. It doesn’t mean analysing business data to find trends or support commercial decisions. A discovery result can inform compliance work, but it isn’t legal advice and can’t determine on its own whether an organisation meets a legal requirement. For context on GDPR, see this GDPR guide.
How sensitive-data discovery differs from data analytics
Analytics explores datasets to identify patterns, answer business questions or inform decisions. The related idea of knowledge discovery in databases describes processes for finding patterns in large datasets. Sensitive data discovery has a narrower starting point: define which sources are in scope, then set search criteria for the information you need to locate.
That distinction matters. A tool built to analyse business trends may not search individual files for sensitive information. A sensitive data scanner, in turn, doesn’t necessarily interpret business data or explain what its patterns mean. Check that the tool’s purpose, sources and search criteria match the review you plan to carry out.
What a useful discovery result contains
A useful finding connects a data type to a location and gives a reviewer evidence to assess. That might mean identifying a file path and the category of information detected, with a masked preview or another limited way to check the result. Evidence should help someone review the finding without exposing more file content than the task requires.
Data mapping means recording where relevant data appears across the sources you have checked. It gives teams a record of the locations found within the defined scope. A map is only as complete as its coverage: sources left out of the scan won’t appear in its results.
In short: sensitive data discovery locates and maps specified types of sensitive information across defined sources, with evidence for review.
These data discovery essentials give teams a practical starting point: define what they need to find, establish which sources the scan will cover, then check that results can be reviewed appropriately. Next, build a source inventory before scanning.
Which data sources should a discovery plan cover?
A scan can only find data in sources it can access and has been authorised to review. Start with an inventory of approved endpoints and repositories. Set clear boundaries before scanning, especially when devices or storage locations have different owners. A source missing from the inventory is a gap in the planned review, not a confirmed clean result.
The right scope depends on the purpose of the review. A plan may include employee endpoints, shared file repositories, relevant mailboxes, external hard drives or scanned documents. NIST describes sensitive information in terms that include information whose unauthorised disclosure could adversely affect the national interest. That is a US government definition, so treat it as background rather than as a test of UK legal obligations.
Build a source inventory before scanning
Record each source in a simple inventory. Note its type, owner, business purpose and whether it is in scope. Then confirm that the organisation has approved access for the proposed scan. This helps the team distinguish sources it can review from those that need permission or clarification first.
- Endpoints: List the approved devices included in the review.
- Repositories: Record relevant shared or managed file locations and their owners.
- Mailboxes: Include only mailboxes that fit the review purpose and approved scope.
For a closer look at mailbox coverage, see Email Data Discovery Software: Finding Sensitive Data in Your Inboxes.
Account for files that are difficult to search
Some documents contain images of text rather than searchable text. A standard text search may not find words inside a scanned page or photograph. Optical character recognition, or OCR, converts text in images into machine-readable text that a discovery process can search. It can help cover scanned documents, but check which formats and sources your chosen tool supports.
Include external hard drives when they are relevant to the review and authorised for scanning. Apply the same scope checks to mailbox data and image-based documents. For more detail, read OCR for data discovery: Finding sensitive data in scanned documents.
These data discovery essentials come down to matching sources to the review purpose, then checking ownership and permission before access. If you’re preparing a scan, you can review discovery setup options against your source inventory.
How to assess scanning, privacy, and evidence
A scanner’s results matter, but so does how it handles the files it checks. Ask where processing occurs, whether file contents are transferred, what evidence reviewers can see and what activity the audit log records. These data discovery essentials help you assess scan boundaries and decide whether findings are suitable for review. IBM’s overview of the data discovery process provides wider context; the questions below focus on handling and evidence.
| Check | Question to ask | Why it matters |
|---|---|---|
| Scope | Which endpoints and approved sources will the scan cover? | Results apply to the sources included in the scan. |
| Processing | Where does scanning happen? Do file contents leave the endpoint? | This clarifies how the scan handles source files. |
| Evidence | Can reviewers check findings without viewing full file contents? | Evidence should support review while limiting unnecessary exposure. |
| Audit logs | Which data access and changes are recorded? | Records help teams review activity related to findings. |
What happens to files during a scan?
Ask directly whether files leave endpoints during scanning. Local processing describes where scan work occurs; file exfiltration means transferring file contents away from the endpoint. EmberHound Discover scans endpoints with local processing and no file exfiltration. This applies to its endpoint scanning, so check the handling arrangements for any other sources in your planned review. The platform security information sets out further security details.
What makes discovery findings reviewable?
Review evidence should give enough context to assess a match without exposing the full contents of a file by default. EmberHound Discover uses masked previews to limit visible content and salted SHA-256 fingerprints to help identify findings. Its audit logging records data access and mutations. These features support review; they don’t certify compliance or decide whether an organisation meets a legal requirement.
Before approving a scan, compare its scope with the sources you intend to review. Then confirm where processing occurs, what file content can be seen and which actions appear in the audit log. Clear answers make findings easier to assess and reduce assumptions about how the scan handled your data.
How to plan a data discovery review without losing scope
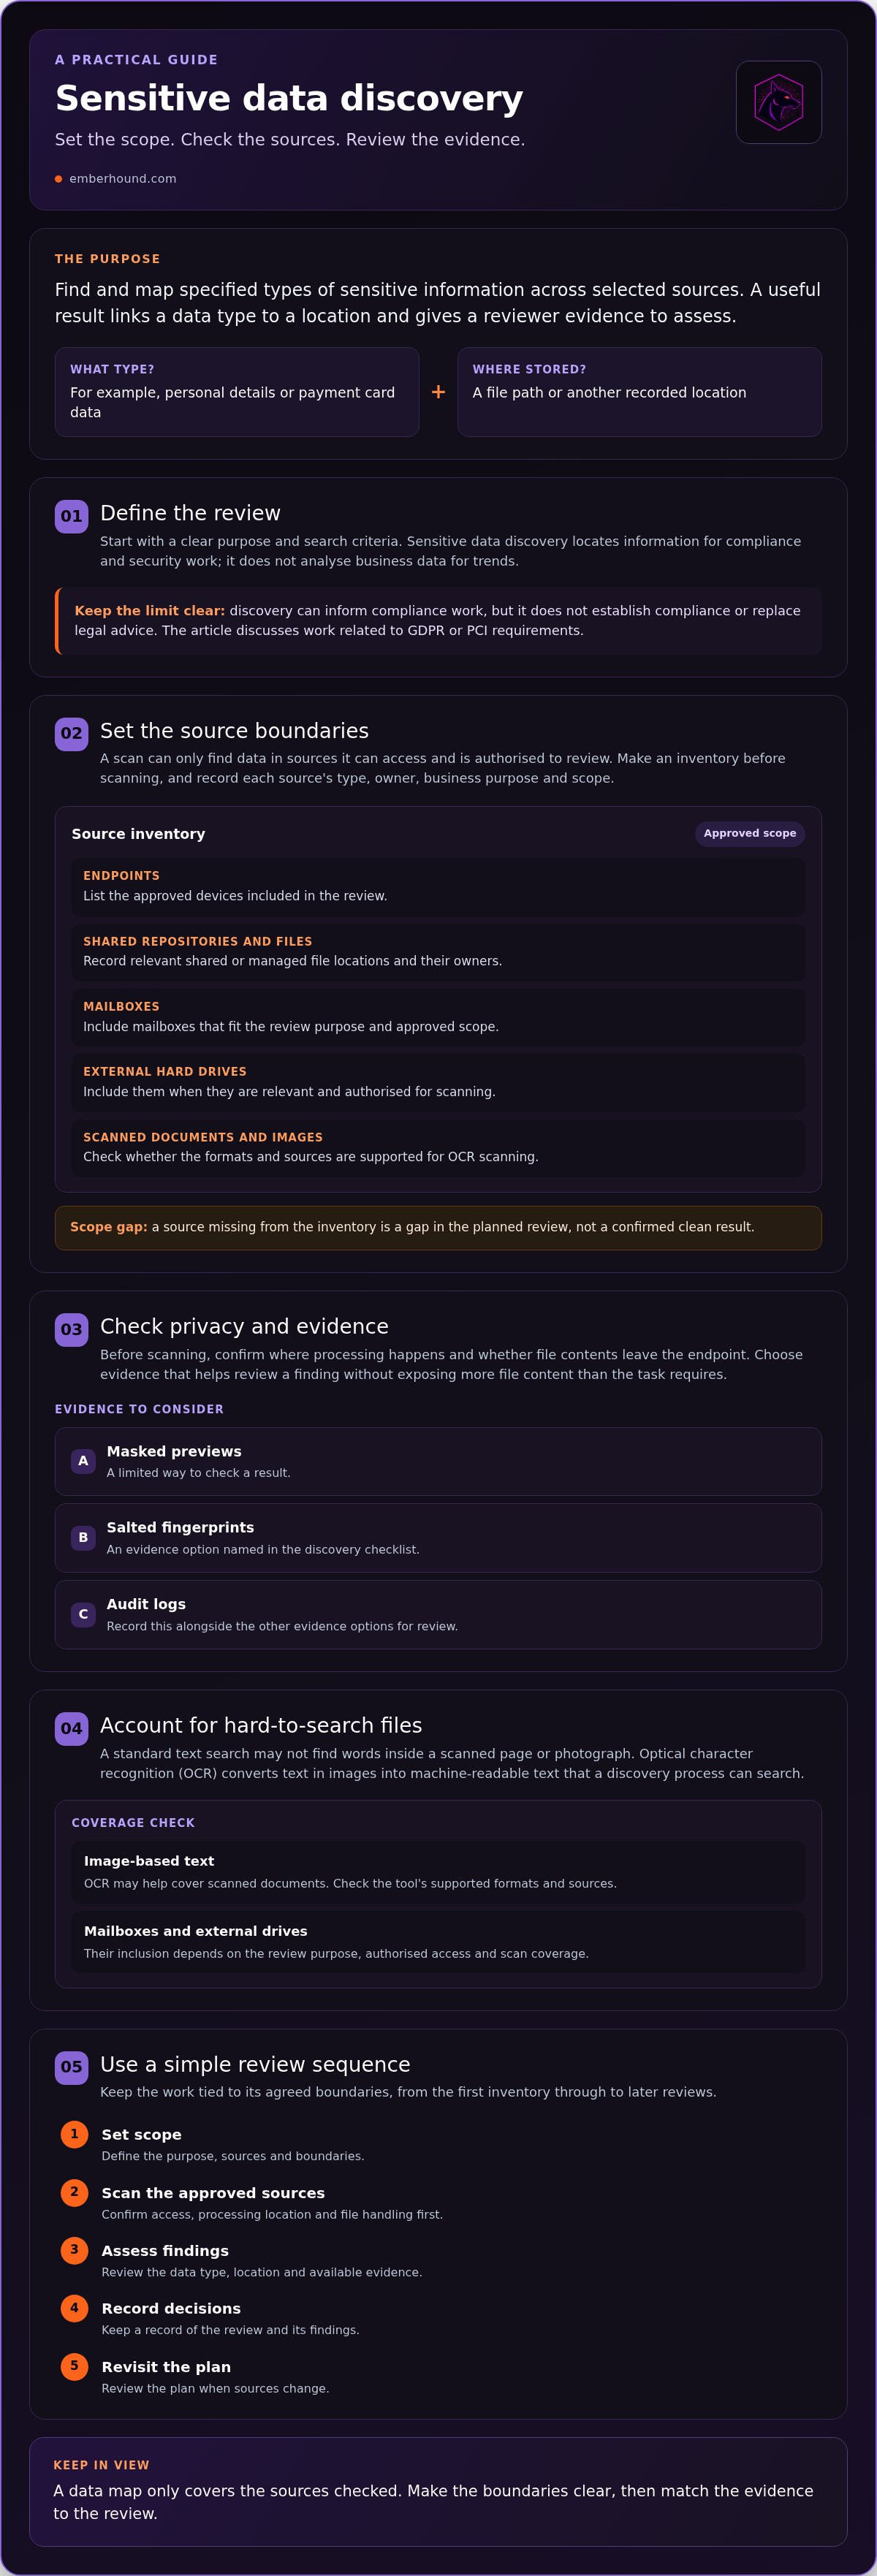
A short plan keeps a review focused and makes the results easier to interpret. Before scanning, agree what question the review should answer, who owns the work and which sources the organisation has approved. These data discovery essentials help a small team avoid scope drift without turning planning into a full technical audit.
Set a workable purpose and scope
State the review’s purpose in one sentence, such as locating specified sensitive information across approved staff endpoints. Name the teams responsible for approving access, running the scan and reviewing findings. Set boundaries for endpoints, repositories and file types. For wider GDPR context, read the GDPR guide.
- Set the purpose. Write down the question the review needs to answer and who will use the results.
- Define the scope. List approved endpoints, repositories and file types. For each proposed source, decide whether it fits the purpose and whether access is authorised. If ownership or permission is unclear, pause and resolve it before adding the source. Record excluded sources and the reason for excluding them.
- Scan. Run the agreed review against the sources in scope. Keep the scan boundaries consistent with the approved plan.
- Review. Assign a named owner to assess findings and decide what needs follow-up. Route uncertain matches to someone who can make that assessment.
- Record. Note the sources covered, exclusions, findings reviewed and decisions made. Keep the record with the review results so readers can understand what the scan did and didn’t cover.
- Revisit. Review the plan when systems, storage locations or the purpose change. Update the scope before the next scan.
Review, record, and repeat findings
Keep a clear distinction between a source that was scanned and one that was unavailable, out of scope or excluded. That gives reviewers context and helps prevent an empty result from being read as confirmation that no relevant data exists anywhere.
For a more detailed audit-preparation checklist, consult GDPR Data Audit Preparation: A Technical Checklist for 2026. Use it alongside this planning sequence, adapting any review to your organisation’s purpose and approved access. Discovery findings can inform compliance work, but they don’t provide legal advice or establish compliance on their own.
Where EmberHound Discover fits into data discovery essentials
Choose a discovery tool by matching its coverage and evidence to the review you need. Check which sources it scans, where processing takes place, whether file contents leave the endpoint and what reviewers can use to assess findings. Confirm the scope before selecting a tool. A scanner designed for endpoints may suit a team looking for sensitive data on those devices, while other sources may need separate coverage options.
Match the tool to the discovery job
EmberHound Discover scans endpoints to find and map sensitive data. Processing takes place locally, with no file exfiltration. Findings include masked previews and salted SHA-256 fingerprints for review. EmberHound also provides GDPR and PCI card data scanning. OCR, local mailbox scanning and external hard drive scanning are available as coverage options when the review requires them.
Check that each option matches the sources authorised for your scan. Endpoint coverage, for example, may address files on approved devices; it doesn’t mean every mailbox or external drive is included. For more product-focused detail, look for GDPR Data Discovery Software: Stop Guessing and Start Scanning.
Start with a defined scan
Set the scope before starting. Identify the approved endpoints or other selected sources, confirm that the required scanning option covers them and assign someone to review the results. A clear owner helps ensure findings are assessed in context. Discovery can support compliance work, but scan results alone don’t establish compliance or provide legal advice.
EmberHound’s pricing is usage-based, and the free-scan entry point gives teams a way to begin with a defined review. Check the intended scope and relevant coverage before proceeding. If you’re comparing tools, use the same criteria for each: source coverage, processing location and the evidence available to reviewers.
Put your discovery plan into practice
The data discovery essentials are clear scope, relevant sources and evidence people can review. Decide what the scan needs to answer, which endpoints or other approved sources are included and who will assess the results. Keep exclusions on record. A scan reports only on the sources it covers, and its findings can support compliance work without providing legal advice or confirming compliance.
Before choosing a tool, check where scanning takes place, whether file contents leave the endpoint and how reviewers can assess matches. Evidence should give useful context without exposing more file content than the review requires.
EmberHound Discover scans endpoints with local processing and no file exfiltration. It provides masked previews and salted SHA-256 fingerprints for review. TLS 1.3 protects data in transit, and AES-256 encryption protects it at rest. These details help you assess how the platform handles scanning and evidence, but they don’t certify a compliance outcome.
Start with an authorised scope and a review owner. A focused first scan can help your team decide what to examine next.
Take it one defined review at a time. Clear boundaries make the next step easier to plan.
Frequently Asked Questions
What is data discovery?
Data discovery is the process of finding and mapping specified information across sources selected for review. Sensitive data discovery focuses on locating information such as personal details or payment card data in files, endpoints or other approved locations. A finding should identify the data type and where it appeared, with evidence a reviewer can assess. Scope matters: results cover the sources scanned, not every place an organisation may store data.
Why is data discovery important for GDPR?
Data discovery can help an organisation understand where personal data appears across the sources it reviews. That visibility can support GDPR-related work, such as assessing data handling or preparing to respond to a subject access request. A scan doesn’t determine whether the organisation complies with UK GDPR, and it isn’t legal advice. Define the review purpose and scope, then seek qualified advice when you need an interpretation of your legal duties.
How does data discovery work?
A team first defines what it wants to find and which approved sources are in scope. A discovery tool checks those sources against its search criteria and returns findings for review. Results can identify a data type and its location, with evidence such as a masked preview or fingerprint. The team assesses the findings and records coverage, exclusions and decisions. The data discovery essentials are purpose, scope and reviewable results.
Can data discovery scan emails and scanned documents?
It can, if the selected tool supports those sources and the organisation has authorised them for scanning. Mailbox scanning can check relevant email content within the agreed scope. Scanned documents may need optical character recognition (OCR), which detects text in images so it can be searched. Check supported formats and source coverage before starting. EmberHound provides local mailbox scanning and OCR as coverage options, alongside endpoint scanning.
Is data discovery the same as data mapping?
No. Data discovery finds specified information in selected sources. Data mapping records where relevant data appears, such as which approved endpoint or repository contains a finding. Mapping can be an output of discovery, but it depends on the scope of the search. If a source was excluded or inaccessible, its contents won’t be represented in the results, so record exclusions alongside the map.
How can a team reduce exposure of sensitive files during discovery?
Limit the scan to sources approved for the review, and check where processing happens and whether file contents are transferred. Choose evidence that lets reviewers assess findings without routinely viewing full files. EmberHound Discover processes endpoint scans locally with no file exfiltration. Its masked previews limit visible file content, while salted SHA-256 fingerprints support review. These controls describe evidence handling; they don’t establish legal compliance.
What should a small team look for in a data discovery tool?
Start with the review job. Check that the tool scans the sources and file types you need, then confirm its processing location and file-handling approach. Ask what evidence reviewers receive and whether activity is recorded in audit logs. Also decide who will own the scope and assess findings. EmberHound Discover scans endpoints and provides masked previews, salted fingerprints and audit logging. Mailbox, external hard drive and OCR scanning are specific coverage options.


