

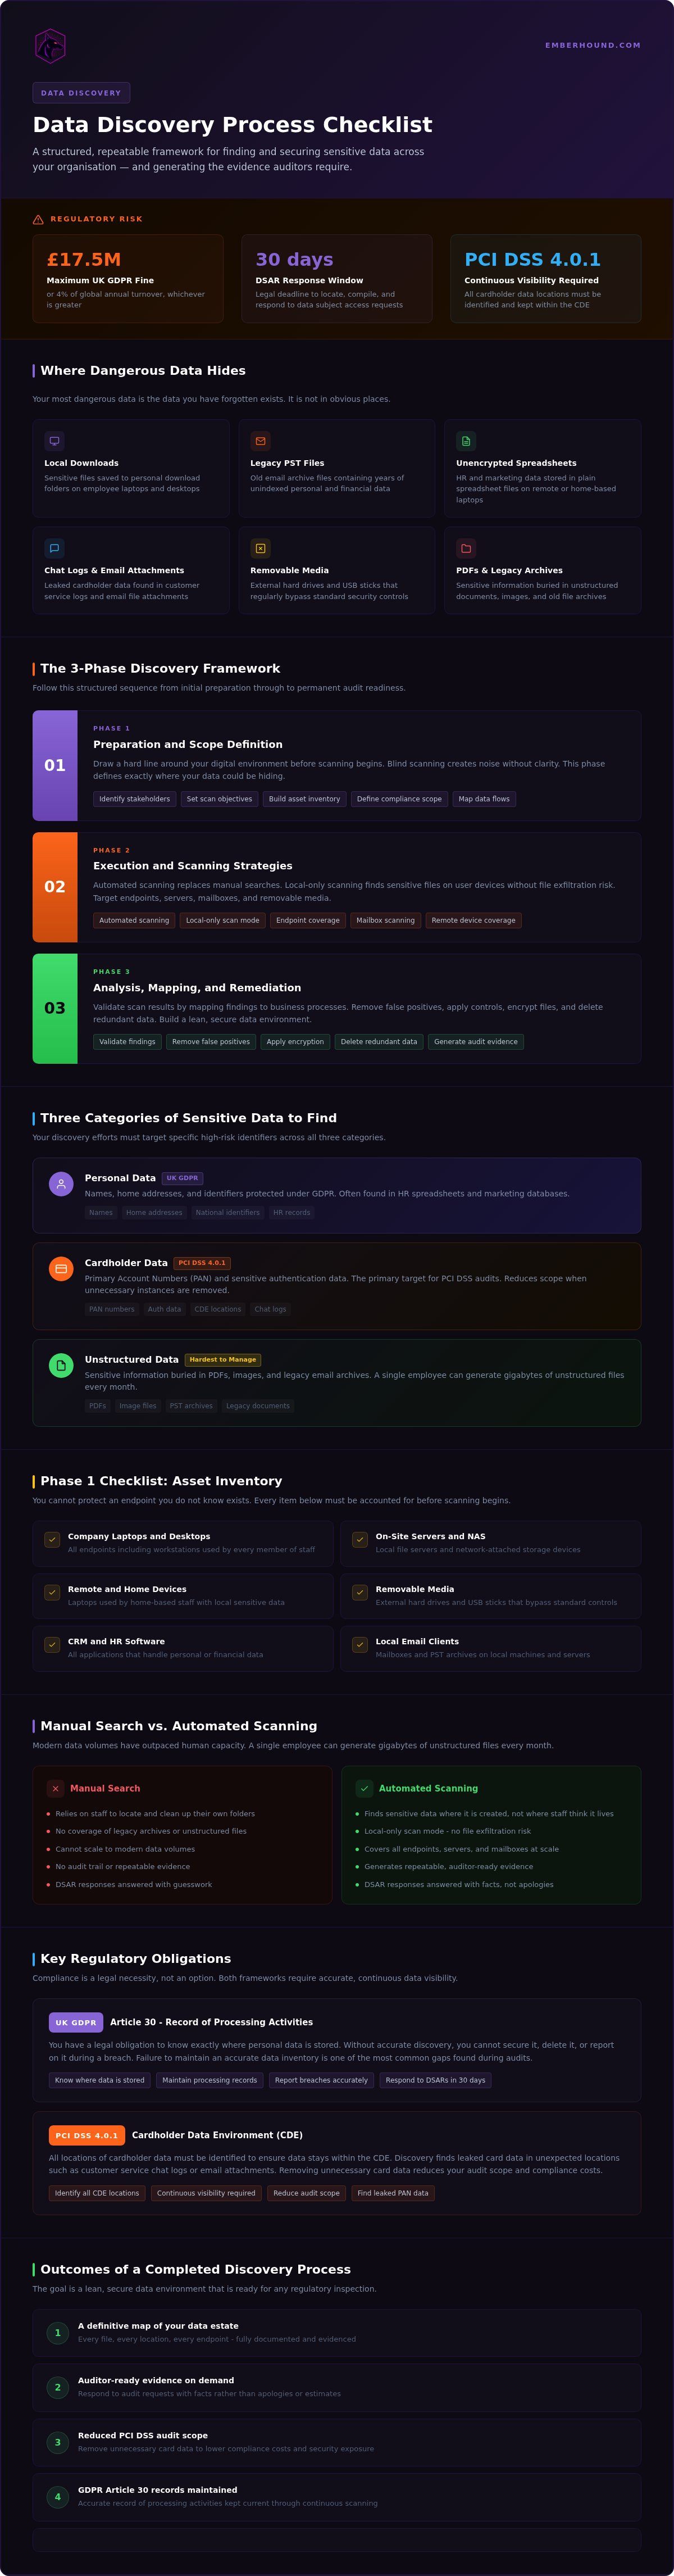
Your most dangerous data is the data you've forgotten exists. It hides in local downloads. It sits in legacy PST files. It waits in unencrypted spreadsheets on a remote laptop. For small IT teams, the fear of a missed file during a 30-day DSAR window is a constant weight. You are right to be concerned. UK GDPR fines reach up to £17.5 million or 4% of global turnover, and PCI DSS 4.0.1 makes continuous visibility a mandatory standard.
This data discovery process checklist is the antidote to that uncertainty. It is a repeatable, structured framework to find and secure sensitive data across your entire organisation. No more manual searches. No more guesswork. Follow this guide to build a clear map of your data estate and generate the evidence auditors demand. We start with identification, move through categorisation, and end with a state of permanent audit readiness.
Key Takeaways
- Define clear boundaries for your search by building an accurate asset inventory of all endpoints, servers, and mailboxes.
- Follow this data discovery process checklist to transition from manual searches to automated scanning that identifies sensitive data where it is created.
- Meet the mandatory requirements of GDPR and PCI DSS 4.0.1 by generating audit-ready evidence that maps your sensitive data estate.
- Validate scan results by mapping findings to business processes to ensure accurate remediation and the removal of false positives.
- Use local-only scanning to find sensitive files on user devices without the security risk of file exfiltration.
What is the Data Discovery Process for Compliance?
Data discovery is the technical process of identifying and categorising sensitive data across your organisation. It is a systematic, continuous effort. It finds where personal data lives, who has access to it, and why it sits there. Without a structured data discovery process checklist, your team is essentially guessing. You cannot protect what you cannot see.
Manual searches no longer work. Modern data volumes in local drives and email inboxes have outpaced human capacity. A single employee can generate gigabytes of unstructured files every month. Relying on staff to clean up their folders is a strategy for failure. Effective discovery replaces this hope with visibility. It provides a definitive map of your data estate. This ensures you can respond to audit requests with facts rather than apologies.
Regulatory Requirements for Data Visibility
Compliance is a legal necessity. Under UK GDPR, you have a legal obligation to know exactly where personal data is stored. Article 30 requires a record of processing activities. This is impossible to maintain without accurate discovery. If you don't know where the data is, you cannot secure it, delete it, or report on it during a breach. Failure to maintain an accurate data inventory is one of the most common compliance gaps found during audits.
PCI DSS 4.0.1 is equally demanding. It requires organisations to identify all locations of cardholder data to ensure they stay within the cardholder data environment (CDE). Proper discovery finds leaked card data in unexpected places. This includes customer service chat logs or email attachments. Data analysis during this phase helps reduce your audit scope. By finding and removing unnecessary card data, you lower your compliance costs and security risk.
Types of Sensitive Data to Identify
Your discovery efforts must target specific high-risk identifiers. A robust data discovery process checklist covers three main categories:
- Personal data: This includes names, home addresses, and identifiers protected by GDPR. It often hides in HR spreadsheets or marketing databases.
- Cardholder data: Primary Account Numbers (PAN) and sensitive authentication data. This is the primary target for PCI DSS audits.
- Unstructured data: This is the most difficult data to manage. It includes sensitive information buried in PDFs, images, and legacy email archives.
Finding this data is the first step toward remediation. Once you have visibility, you can apply controls, encrypt files, or delete redundant information. The goal is a lean, secure data environment that is ready for any regulatory inspection.
Phase 1: Preparation and Scope Definition
Preparation is the most critical stage of the audit. Blind scanning is a waste of resources. It creates noise without providing clarity. This first phase of the data discovery process checklist involves drawing a hard line around your digital environment. You must know exactly where your data could be hiding before you attempt to find it. Without a defined scope, you will miss the very files that lead to compliance failures.
Success requires the right people in the room. Identify your key stakeholders early. This includes the Data Protection Officer (DPO) and IT security leads. They provide the context needed to set clear objectives. Are you fulfilling a 30-day DSAR request? Are you attempting to reduce your PCI DSS audit scope? Define these goals now. It dictates the depth and frequency of your scans.
Creating a Data Asset Inventory
An accurate asset inventory is the foundation of the discovery process. You cannot protect an endpoint you don't know exists. Start by listing every piece of hardware in the organisation. This list must include:
- Endpoints: Company laptops, desktops, and workstations.
- Storage: On-site servers and network-attached storage (NAS).
- Removable media: External hard drives and USB sticks that often bypass standard security controls.
- Remote devices: Laptops used by home-based staff that may contain local sensitive data.
Software platforms are equally important. Identify every application that handles personal data. This includes CRM systems, HR portals, and local email clients. A complete inventory ensures that no corner of the business remains a blind spot during the execution phase.
Defining Compliance Scope
Scope definition prevents "audit creep". Determine which specific regulations apply to your different data sets. You might handle cardholder data in one department and sensitive employee files in another. Map your data flows to understand how this information enters and moves through the business. This exercise identifies high-risk paths where data might leak into unencrypted areas.
Consult our GDPR guide to align your technical preparation with legal requirements. This ensures your discovery strategy meets the specific evidence standards required by the ICO. Setting these boundaries early saves time and reduces the burden on your IT team. If you want to start mapping your environment today, you can begin with a free scan to identify immediate risks.
Phase 2: Execution and Scanning Strategies
Execution is where your preparation meets reality. This stage of the data discovery process checklist requires a choice between manual sampling and automated scanning. Manual sampling is slow. It relies on human accuracy. It creates a high risk of oversight. Automated scanning tools provide the speed and depth needed to cover modern data volumes. They don't get tired. They don't skip files. They provide the consistency an auditor expects to see.
Prioritise your endpoints. Data is created and used on user devices. This is where sensitive data often leaks out of secure systems into local drives or temporary folders. Scanning these devices first gives you the fastest visibility into your highest risk areas. It's the most direct way to find the data that staff have forgotten they saved.
Security is paramount during the scan itself. Some legacy tools move your files to a central server or cloud repository to analyse them. This increases your attack surface. It creates a new security risk whilst you are trying to solve an old one. Implement local-only processing instead. This ensures your sensitive data stays on the device. Only the metadata and salted fingerprints should leave the endpoint. This approach maintains strict data privacy whilst providing the evidence you need for a GDPR or PCI audit.
Endpoint vs Cloud Scanning
Endpoint scanning identifies data on employee laptops and local drives. These are often the most neglected areas of a data estate. Cloud scanning focuses on shared repositories like SharePoint or AWS buckets. Whilst cloud storage is more structured, it is not immune to data sprawl. A hybrid approach is necessary for modern UK businesses. You must cover both the central storage and the peripheral devices to ensure no sensitive data is missed.
Using OCR for Hidden Sensitive Data
Sensitive data isn't always in a text file. It hides in scanned invoices, ID documents, and screenshots. Standard scanners miss this information. OCR (Optical Character Recognition) technology converts text within images and PDFs into searchable data. This is essential for identifying card data in scanned receipts or passport numbers in HR documents. Integrating OCR into your data discovery process checklist ensures that your audit captures data hidden in non-text files.
You can read more about OCR for data discovery to understand how this technology finds data that manual searches will never see. Without OCR, your discovery process has a massive blind spot. It leaves you vulnerable to PCI DSS failures if card data is hiding in a "receipts.pdf" file. Don't leave your compliance to chance by ignoring unstructured image data.
Phase 3: Analysis, Mapping, and Remediation
Raw scan results are just a list. They carry no value until you apply logic to them. This phase of the data discovery process checklist is where you turn technical findings into compliance. You must review your scan results to validate each hit. Every automated tool produces some noise. You need to filter out false positives to ensure your remediation efforts target real risks. This validation process prevents your IT team from wasting hours on non-sensitive files.
Once validated, map this data to your business processes. You need to know why a specific file exists and who owns the process that created it. This isn't just a security exercise. It's a regulatory requirement. Proving you have control over your data estate satisfies an auditor during a GDPR or PCI DSS inspection. You are moving from a state of "we think we're secure" to "we can prove we're secure".
Data Mapping and Inventory Updates
Your Record of Processing Activities (ROPA) is a living document. It must reflect the current reality of your data storage. Use your scan results to update this record immediately. If you find personal data in a legacy folder, document it. If you find card data in a customer service mailbox, record the exposure. This documentation is your primary defence during a regulatory audit.
Visualising these data concentrations helps you identify high-risk areas. You might find that a specific department is a hotspot for sensitive data sprawl. Linking discovered data to specific data subjects also accelerates your response to Data Subject Access Requests (DSARs). When a request arrives, you won't be searching manual drives under pressure. You will be looking at a pre-verified map. This reduces the risk of missing the 30-day deadline.
Remediation and Data Minimisation
Take decisive action on high-risk findings. The most effective way to secure data is to not have it at all. Delete redundant, obsolete, or trivial (ROT) data immediately. This is the core of data minimisation. If the data serves no business purpose, it is a liability. Every file you delete is one less file that can be breached or audited.
For data you must keep, move it to secure, encrypted locations. Don't leave sensitive files on unencrypted local drives or in public mail folders. Establish a regular scanning schedule to prevent sprawl from returning. Compliance is not a one-time event. It is a state of constant readiness that requires continuous monitoring.
Automating the Checklist with EmberHound
Manual checklists provide the structure. EmberHound provides the speed. It is a data discovery platform that automates the entire data discovery process checklist for lean IT teams. You don't have to spend weeks manually sampling folders or interviewing staff. The platform identifies, maps, and categorises your sensitive data automatically. It turns a complex regulatory burden into a repeatable, background process.
Evidence is the core of any audit. EmberHound provides this without compromising security. The platform uses masked previews and salted SHA-256 fingerprints. This creates a permanent, audit-ready record of your findings. You can prove to a regulator that you've found the data without ever exposing the raw sensitive information in your reports. It is the cleanest way to satisfy both GDPR and PCI DSS 4.0.1 requirements.
Why Local Scanning is Better
Local processing is a security necessity. Most discovery tools move files to a central cloud server for analysis. This increases your attack surface. It creates a secondary data breach risk. EmberHound scans endpoints locally. The analysis happens on the device where the data already lives. No files are exfiltrated. This ensures your sensitive information stays exactly where it belongs.
This approach also reduces network load. You can scan remote devices and external hard drives without clogging your bandwidth. It ensures that home-based staff are included in your compliance scope without the need for complex VPN configurations. Learn more about our credible security posture to see how we prioritise data privacy at every step.
Start Your Free Data Discovery Scan
Small and medium businesses don't have time for "deployment drama". You need a tool that works immediately. EmberHound requires no complex server setup or long-term contracts. You can be up and running in minutes. Our usage-based pricing ensures you only pay for what you need. It allows your compliance strategy to scale alongside your business growth without unnecessary overhead.
Visit our pricing page to see how we help lean teams manage their data estate. Visibility shouldn't be a luxury reserved for giant enterprises. You can identify your immediate risks today without any financial commitment. Stop guessing where your data lives and start proving your compliance with a structured, automated approach.
Secure Your Data Estate with Confidence
Compliance is a continuous state of readiness. You've seen how a structured data discovery process checklist transforms a chaotic manual search into a repeatable technical framework. By defining your scope and prioritising endpoint visibility, you eliminate the blind spots that lead to GDPR fines and PCI DSS failures. The goal is simple: total visibility of your sensitive data without the security risk of moving files to the cloud.
You don't need a massive budget or a complex deployment to achieve this. EmberHound provides audit-ready evidence through a platform designed for lean teams. There's no deployment drama. You get salted fingerprints for your records and usage-based pricing that scales with you. It's time to stop worrying about what might be hiding in your local drives and start proving that your organisation is secure.
Take the first step toward permanent audit readiness. Your data estate is manageable when you have the right tools to map it.
Frequently Asked Questions
What is the data discovery process in GDPR?
The data discovery process in GDPR is the technical identification of personal data held by your organisation. It ensures you know exactly where names, addresses, and identifiers live across your network. This visibility is a requirement for an accurate Record of Processing Activities (ROPA) under Article 30. It also allows you to respond to Data Subject Access Requests (DSARs) within the mandatory 30-day window without missing hidden files on local drives.
How long does a typical data discovery exercise take?
A manual data discovery exercise often takes weeks of interviewing staff and sampling folders. It is a slow, error-prone process. Using an automated data discovery process checklist with tools like EmberHound reduces this to hours or days. The duration depends on the volume of unstructured data and the number of endpoints. Automation ensures the search is consistent and thorough. This delivers audit-ready evidence for GDPR or PCI DSS 4.0.1.
Can I perform data discovery manually?
You can attempt data discovery manually, but it is rarely effective for modern data volumes. Manual searches rely on staff memory and basic file-system tools. They often miss sensitive data hidden in legacy mailboxes or local downloads. This creates a high risk of oversight during a regulatory audit. Automated tools are necessary to scan thousands of files across multiple devices with the precision required to satisfy strict compliance standards like PCI DSS.
What is the difference between data discovery and data mapping?
Data discovery is the technical act of finding and identifying sensitive data in your environment. Data mapping is the process of documenting how that data flows through your business and why you are processing it. Discovery provides the raw facts. Mapping provides the context. You need discovery to ensure your data map is accurate. Without technical discovery, your data map is just a theoretical guess that won't hold up under auditor scrutiny.
Why is endpoint scanning important for compliance?
Endpoint scanning is vital because data is created and used on local devices. Employees often save sensitive files to their desktops or download attachments to local folders. These locations are frequently missed by centralised cloud-only scans. Local endpoint scanning captures the "shadow data" that lives outside of your structured databases. This ensures your compliance scope covers the actual behaviour of your staff.
How does OCR help in the data discovery process?
OCR (Optical Character Recognition) identifies sensitive data hidden within images and scanned documents. Standard search tools only look at text files. They miss card numbers in scanned receipts or passport details in PDF images. Including OCR into your data discovery process checklist ensures these unstructured files are searchable. This capability is essential for businesses that handle physical paperwork or scanned invoices.
What happens after the data discovery scan is complete?
Once the scan is complete, you must validate the results and begin remediation. This involves a review of findings to remove false positives and the assignment of data to specific business processes. You then take action by deleting redundant data or moving sensitive files to encrypted storage. Finally, you generate audit-ready reports. These reports provide the evidence needed to prove your compliance posture to regulators during a formal inspection.
Do I need to scan employee emails for personal data?
Yes, scanning employee emails is a requirement for full GDPR and PCI compliance. Mailboxes are a primary source of data sprawl. Sensitive attachments and personal identifiers often sit in sent items or archived folders for years. If you don't scan these areas, you cannot fulfil a DSAR accurately. This process also prevents cardholder data from leaking through customer service communications. Scanning emails ensures that your data inventory is complete and accurate.


